Storybook 인터랙션 테스트, 함수형으로 설계하기
Storybook 인터랙션 테스트를 함수형으로 설계하여 재사용성을 높이는 방법. 레고 블록처럼 조립하는 테스트 시나리오 작성 패턴.
TL;DR
- 컴포넌트 테스트를 수동으로 하다 보니 UI 변경마다 같은 검증을 반복하게 됐다
- 함수형 테스트 스텝과 필드 매핑을 분리해서 변경 지점을 단일화했다
- 레고 블록처럼 조립하는 구조로 시나리오 작성 시간을 대폭 줄였다
문제 인식
Storybook으로 컴포넌트를 개발하면서, 매번 같은 검증을 수동으로 반복하고 있었다.
1
2
3
4
5
6
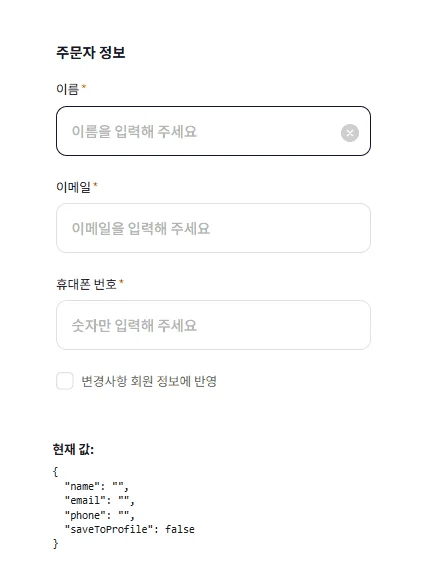
1. 주문자 정보 폼 열기
2. 이름, 이메일, 전화번호 입력
3. 값이 제대로 들어갔는지 확인
4. 체크박스 클릭
5. 체크 상태 확인
...
문제는 UI가 바뀔 때마다 이 과정을 처음부터 다시 해야 한다는 것이었다. placeholder 텍스트 하나 바뀌어도, 버튼 라벨 하나 바뀌어도 전체 플로우를 다시 확인해야 했다.
초기에는 Storybook의 play 함수에 직접 테스트 코드를 작성했다:
1
2
3
4
5
6
7
8
9
10
11
12
13
14
15
// 초기 방식: 스토리마다 중복 코드
export const Default: Story = {
  play: async ({ canvasElement }) => {
    const canvas = within(canvasElement)
    const user = userEvent.setup()

    const nameInput = canvas.getByPlaceholderText('이름을 입력해 주세요')
    await user.type(nameInput, '홍길동')

    const emailInput = canvas.getByPlaceholderText('이메일을 입력해 주세요')
    await user.type(emailInput, 'test@example.com')

    // ... 반복되는 코드
  }
}
스토리가 10개, 20개로 늘어나면서 문제가 심각해졌다:
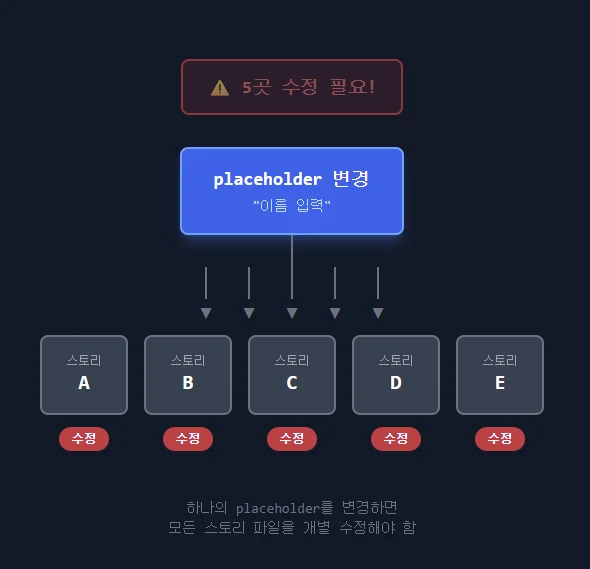
- 중복: 같은 셀렉터 로직이 여러 파일에 흩어져 있다
- 취약성: placeholder 하나 바뀌면 관련 스토리 전부 수정해야 한다
- 가독성: 테스트 의도보다 DOM 조작 코드가 더 많다
해결 방향 설계
목표를 세 가지로 잡았다:
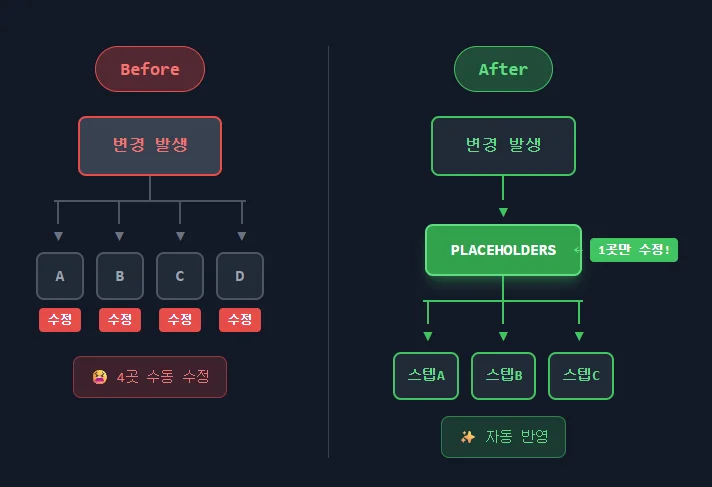
- 변경 지점 단일화 - UI 텍스트가 바뀌어도 한 곳만 수정하면 된다
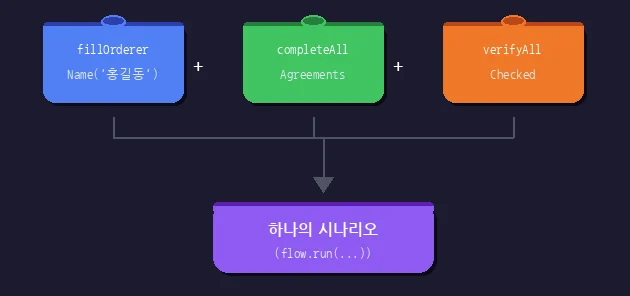
- 재사용 가능한 스텝 - 레고 블록처럼 조립해서 시나리오를 만든다
- 선언적 테스트 - “무엇을 테스트하는지”가 코드에서 바로 보인다
핵심 아이디어는 함수형 테스트 스텝이었다. 각 스텝은:
- 상태를 갖지 않는 순수 함수
- context를 입력받아 작업을 수행
- 여러 스텝을 순차적으로 조합 가능
구현
1. TestFlow 러너
테스트 컨텍스트를 관리하고 스텝들을 순차 실행하는 러너를 만들었다:
1
2
3
4
5
6
7
8
9
10
11
12
13
14
15
16
17
18
19
20
21
22
23
// src/shared/testing/test-flow.ts

export interface TestFlowContext {
  canvas: BoundFunctions<typeof queries>  // Testing Library 쿼리
  user: ReturnType<typeof userEvent.setup> // 유저 이벤트
  data: Record<string, unknown>            // 스텝 간 데이터 공유
}

export type TestStep = (ctx: TestFlowContext) => Promise<void>

export function createTestFlow(canvasElement: HTMLElement) {
  const canvas = within(canvasElement)
  const user = userEvent.setup({ delay: 50 })
  const context = { canvas, user, data: {} }

  return {
    async run(...steps: TestStep[]) {
      for (const step of steps) {
        await step(context)
      }
    }
  }
}
2. 공통 인터랙션 함수
자주 사용하는 인터랙션을 함수로 추출했다:
1
2
3
4
5
6
7
8
9
10
11
12
13
14
15
16
17
18
19
20
21
22
23
24
25
26
27
28
29
30
31
32
// src/shared/testing/interactions.ts

export const checkbox = {
  async click(ctx: TestFlowContext, label: string) {
    const el = ctx.canvas.getByRole('checkbox', { name: label })
    await ctx.user.click(el)
  },

  async verifyChecked(ctx: TestFlowContext, label: string) {
    const el = ctx.canvas.getByRole('checkbox', { name: label })
    await expect(el).toBeChecked()
  }
}

export const button = {
  async click(ctx: TestFlowContext, label: string) {
    const btn = ctx.canvas.getByRole('button', { name: label })
    await ctx.user.click(btn)
  },

  async verifyDisabled(ctx: TestFlowContext, label: string) {
    const btn = ctx.canvas.getByRole('button', { name: label })
    await expect(btn).toBeDisabled()
  }
}

export const verify = {
  async textExists(ctx: TestFlowContext, text: string) {
    const element = ctx.canvas.getByText(text)
    await expect(element).toBeInTheDocument()
  }
}
3. 필드 매핑 분리 (핵심)
UI 텍스트와 테스트 로직을 분리하는 것이 핵심이었다:
1
2
3
4
5
6
7
8
9
10
11
12
13
14
15
16
17
18
19
20
21
22
23
24
25
26
27
28
29
30
31
32
33
34
35
// src/features/order/ui/OrdererInfoSection/__stories__/orderer.interactions.ts
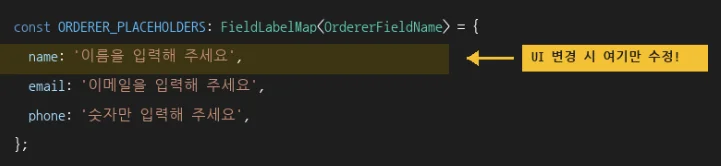
// 1. 필드 매핑 - UI 변경 시 여기만 수정
const ORDERER_PLACEHOLDERS = {
name: '이름을 입력해 주세요',
email: '이메일을 입력해 주세요',
phone: '숫자만 입력해 주세요',
} as const
// 2. 폼 인터랙션 인스턴스 생성
const ordererForm = createFormInteractions(ORDERER_PLACEHOLDERS, 'placeholder')
// 3. 개별 스텝 함수 - 재사용 가능
export const fillOrdererName = (name: string): TestStep => async (ctx) => {
await ordererForm.fill(ctx, 'name', name)
}
export const fillOrdererEmail = (email: string): TestStep => async (ctx) => {
await ordererForm.fill(ctx, 'email', email)
}
export const verifyOrdererName = (expected: string): TestStep => async (ctx) => {
await ordererForm.verifyValue(ctx, 'name', expected)
}
// 4. 복합 플로우 - 스텝 조합
export const completeOrdererForm = (data: OrdererData): TestStep => async (ctx) => {
await ordererForm.fill(ctx, 'name', data.name)
await ordererForm.fill(ctx, 'email', data.email)
await ordererForm.fill(ctx, 'phone', data.phone)
if (data.saveToProfile) {
await checkbox.check(ctx, '변경사항 회원 정보에 반영')
}
}
placeholder가 “이름을 입력해 주세요”에서 “주문자 이름”으로 바뀌어도, ORDERER_PLACEHOLDERS.name 한 줄만 수정하면 된다.
4. 스토리에서 사용
1
2
3
4
5
6
7
8
9
10
11
12
13
14
15
16
17
18
19
20
21
22
// OrdererInfoSection.stories.tsx

export const InteractionDemo: Story = {
  play: async ({ canvasElement }) => {
    const flow = createTestFlow(canvasElement)

    await flow.run(
      completeOrdererForm({
        name: '홍길동',
        email: 'test@example.com',
        phone: '01012345678',
        saveToProfile: true,
      }),
      verifyOrdererFormFilled({
        name: '홍길동',
        email: 'test@example.com',
        phone: '01012345678',
        saveToProfile: true,
      })
    )
  }
}
테스트 의도가 명확하게 드러난다. “주문자 폼을 채우고, 채워진 값을 검증한다.”
5. 도메인별 인터랙션 모듈
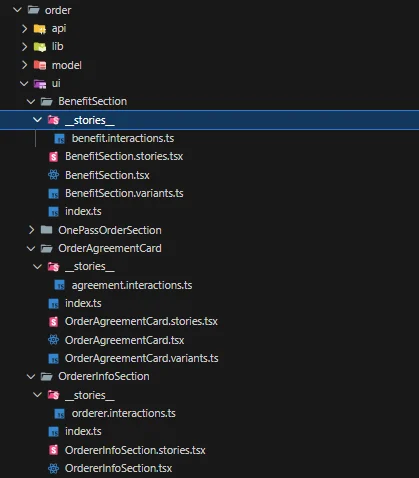
각 컴포넌트마다 __stories__/*.interactions.ts 파일을 만들어서 관리한다:
1
2
3
4
5
6
7
8
9
10
src/features/order/ui/
├── OrdererInfoSection/
│   ├── __stories__/
│   │   └── orderer.interactions.ts    # 주문자 폼 테스트 스텝
│   ├── OrdererInfoSection.tsx
│   └── OrdererInfoSection.stories.tsx
├── OrderAgreementCard/
│   ├── __stories__/
│   │   └── agreement.interactions.ts  # 동의 체크박스 테스트 스텝
│   └── ...
동의 체크박스 테스트도 같은 패턴:
1
2
3
4
5
6
7
8
9
10
11
12
13
14
15
16
17
18
19
20
21
22
23
// agreement.interactions.ts

const LABELS = {
  allAgree: '주문 내용 확인 및 전체 동의',
  purchase: '(필수) 구매조건 확인 및 결제 진행 동의',
  sellerPrivacy: '(필수) 개인정보 판매자 제공 동의',
  // ...
}

export const clickAllAgree: TestStep = async (ctx) => {
  await checkbox.click(ctx, LABELS.allAgree)
}

export const verifyAllChecked: TestStep = async (ctx) => {
  await checkbox.verifyChecked(ctx, LABELS.allAgree)
  await checkbox.verifyChecked(ctx, LABELS.purchase)
  await checkbox.verifyChecked(ctx, LABELS.sellerPrivacy)
  // ...
}

export const completeAllAgreements: TestStep = async (ctx) => {
  await checkbox.check(ctx, LABELS.allAgree)
}
적용 결과
변경 대응 시간 단축
| 상황 | Before | After |
|---|---|---|
| placeholder 변경 | 관련 스토리 5개 수정 | PLACEHOLDERS 1줄 수정 |
| 버튼 라벨 변경 | 관련 스토리 3개 수정 | LABELS 1줄 수정 |
| 새 폼 필드 추가 | 각 스토리에 코드 추가 | 스텝 함수 1개 추가 |
테스트 가독성 향상
1
2
3
4
5
6
7
8
9
10
11
12
13
14
// Before: 의도 파악이 어려움
const input = canvas.getByPlaceholderText('이름을 입력해 주세요')
await user.clear(input)
await user.type(input, '홍길동')
const checkbox = canvas.getByRole('checkbox', { name: /전체 동의/ })
await user.click(checkbox)
expect(checkbox).toBeChecked()

// After: 의도가 명확함
await flow.run(
  fillOrdererName('홍길동'),
  completeAllAgreements,
  verifyAllChecked
)
시나리오 조합의 유연성
여러 컴포넌트에 걸친 통합 테스트도 스텝 조합으로 가능:
1
2
3
4
5
6
7
8
9
10
11
12
13
14
await flow.run(
  // 주문자 정보 입력
  completeOrdererForm(ordererData),

  // 동의 체크
  completeAllAgreements,

  // 결제 수단 선택
  clickFirstCard,

  // 최종 검증
  verifyOrdererFormFilled(ordererData),
  verifyAllChecked
)
한계와 트레이드오프
초기 설정 비용
컴포넌트마다 *.interactions.ts 파일을 만들어야 한다. 단순한 컴포넌트에는 오버엔지니어링일 수 있다.
기준: 스토리가 3개 이상이거나, UI 텍스트가 자주 바뀔 가능성이 있으면 분리한다.
Storybook 환경 한정
이 패턴은 Storybook 인터랙션 테스트(play 함수)에 최적화되어 있다. Playwright나 Cypress 같은 E2E 도구에서는 약간의 어댑터가 필요하다.
비동기 타이밍
애니메이션이나 API 응답을 기다려야 하는 경우, wait.forMs()나 wait.forText() 같은 대기 함수를 적절히 사용해야 한다.
1
2
3
4
5
6
7
8
9
export const wait = {
  async forText(ctx: TestFlowContext, text: string, timeout = 3000) {
    await waitFor(() => ctx.canvas.getByText(text), { timeout })
  },

  async forMs(ms: number) {
    await new Promise(resolve => setTimeout(resolve, ms))
  }
}
추가 기능
1. 타입 안전성
필드명 오타를 컴파일 타임에 잡을 수 있다. createFormInteractions가 제네릭으로 키를 추론하기 때문:
1
2
3
4
5
6
7
8
9
10
11
12
13
14
// 필드 타입 정의
type OrdererFieldName = 'name' | 'email' | 'phone'

const ORDERER_PLACEHOLDERS: FieldLabelMap<OrdererFieldName> = {
  name: '이름을 입력해 주세요',
  email: '이메일을 입력해 주세요',
  phone: '숫자만 입력해 주세요',
}

const ordererForm = createFormInteractions(ORDERER_PLACEHOLDERS, 'placeholder')

// 이제 오타를 잡아준다
ordererForm.fill(ctx, 'namee', value)  // ❌ 타입 에러: 'namee'는 없음
ordererForm.fill(ctx, 'name', value)   // ✅ OK
createFormInteractions 구현:
1
2
3
4
5
6
7
8
9
10
export function createFormInteractions<TFieldName extends string>(
  fieldMap: FieldLabelMap<TFieldName>,  // Record<TFieldName, string>
  mode: FindByMode = 'label'
) {
  return {
    async fill(ctx: TestFlowContext, fieldName: TFieldName, value: string) {
      // fieldName이 TFieldName으로 제한됨
    }
  }
}
2. 디버깅 로그
스텝이 많아지면 어디서 실패했는지 찾기 어렵다. 각 스텝 실행 시 로깅을 추가했다:
1
2
3
4
5
6
7
8
9
10
11
12
13
14
15
async run(...steps: TestStep[]) {
  for (const step of steps) {
    const stepName = step.name || 'anonymous'
    console.log(`[TestFlow] ▶ ${stepName}`)

    try {
      const result = await step(context)
      console.log(`[TestFlow] ✓ ${stepName}`)
      if (result) Object.assign(context.data, result)
    } catch (error) {
      console.error(`[TestFlow] ✗ ${stepName} failed`)
      throw error
    }
  }
}
Storybook Interactions 패널에서 로그가 보이므로, 실패 지점을 빠르게 파악할 수 있다.
3. 스텝 간 데이터 공유
TestFlowContext의 data 필드를 활용하면 스텝 간 동적 값을 전달할 수 있다:
1
2
3
4
5
6
7
8
9
10
11
12
13
14
15
16
17
18
19
20
21
// 주문 생성 후 ID 저장
const createOrderAndSaveId: TestStep = async (ctx) => {
  await button.click(ctx, '주문하기')
  await wait.forText(ctx, '주문이 완료되었습니다')

  const orderId = ctx.canvas.getByTestId('order-id').textContent
  return { orderId }  // data에 자동 병합됨
}

// 저장된 ID로 검증
const verifyOrderInList: TestStep = async (ctx) => {
  const { orderId } = ctx.data as { orderId: string }
  await verify.textExists(ctx, orderId)
}

// 조합해서 사용
await flow.run(
  createOrderAndSaveId,
  navigateToOrderList,
  verifyOrderInList  // 위에서 저장한 orderId 사용
)
스텝 함수가 객체를 반환하면 context.data에 병합되는 구조다.
마무리
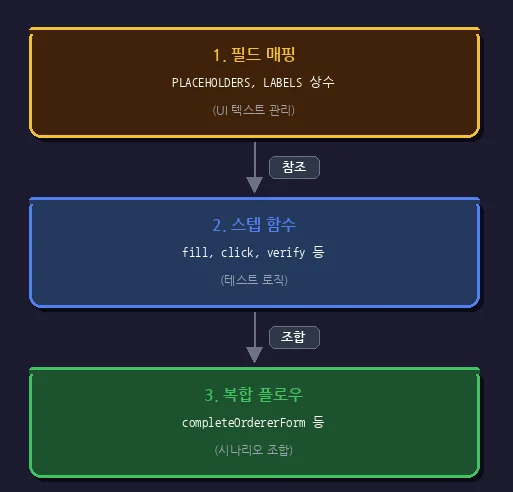
함수형 테스트 스텝 패턴의 핵심은 관심사의 분리다:
- 필드 매핑 (
PLACEHOLDERS,LABELS) - UI 텍스트 변경 담당 - 스텝 함수 (
fill,click,verify) - 테스트 로직 담당 - 복합 플로우 (
complete*) - 시나리오 조합 담당
이렇게 분리하면 각 레이어가 독립적으로 변경 가능하고, 테스트 코드의 의도가 명확해진다.
수동 테스트에 지쳐있다면, 작은 것부터 자동화해보자. 가장 자주 반복하는 검증부터 스텝 함수로 만들어보면, 금방 패턴이 잡힌다.