React Native Android namespace 자동화하기
React Native 업그레이드 시 Android 라이브러리의 namespace를 자동으로 추가하는 스크립트 구현 방법. postinstall 훅을 활용한 자동화 가이드.
문제 상황
최근 React Native 프로젝트를 업그레이드하는 과정에서 골치 아픈 문제가 발생했다. 안드로이드 빌드 시 각 라이브러리마다 namespace를 일일이 추가해줘야 하는 상황이었다. 특히 node_modules를 삭제하고 재설치할 때마다 이 작업을 반복해야 했는데, 이는 매우 비효율적이고 시간 낭비였다.
처음에는 Android Studio에서 각 라이브러리의 build.gradle 파일을 열어 수동으로 namespace를 추가했다. 하지만 20개가 넘는 라이브러리에 대해 이 작업을 반복하는 것은 너무 고통스러웠다. 특히 새로운 팀원이 프로젝트를 셋업할 때마다 이런 불편함을 겪어야 한다는 점이 마음에 걸렸다.
해결 과정
이 문제를 자동화하기 위해 세 가지 주요 작업을 진행했다.
1. package.json에 postinstall 스크립트 추가
먼저 npm install 실행 시 자동으로 namespace를 추가하도록 package.json의 scripts에 postinstall을 추가했다.
1
2
3
"scripts": {
  "postinstall": "node scripts/add-namespaces.ts && patch-package"
}
2. gradle.properties에 namespace 정보 추가
안드로이드 빌드 시스템이 참조할 수 있도록 android/gradle.properties 파일에 각 라이브러리의 namespace를 정의했다.
1
2
3
4
android.enableNamespaceCheck=true
react-native-gesture-handler.namespace=com.swmansion.gesturehandler
react-native-webview.namespace=com.reactnativecommunity.webview
# ... 기타 라이브러리들의 namespace
이렇게 하면 프로젝트에서 사용하는 모든 라이브러리의 namespace를 한 곳에서 관리할 수 있다.
3. namespace 자동 추가 스크립트 작성
가장 핵심적인 부분은 scripts/add-namespaces.ts 파일이다. 이 스크립트는 node_modules 내의 각 React Native 라이브러리의 build.gradle 파일을 찾아서 namespace를 자동으로 추가해준다.
1
2
3
4
5
6
7
8
9
10
11
12
13
14
15
16
17
18
19
20
21
22
23
24
25
26
27
28
29
30
31
32
33
34
35
36
37
38
39
40
41
42
43
44
45
46
47
48
49
50
51
52
53
54
55
56
57
58
59
60
61
62
63
64
65
66
67
68
69
70
71
72
73
74
75
76
77
78
79
80
81
82
83
84
85
86
87
88
89
90
91
92
93
const fs = require('fs');
const path = require('path');

const nodeModulesPath = path.join(__dirname, '..', 'node_modules');

const namespaceMap = {
  'react-native-gesture-handler': 'com.swmansion.gesturehandler',
  'react-native-firebase-messaging': 'io.invertase.firebase.messaging',
  'react-native-kakao-share-link': 'com.reactnativekakaosharelink',
  'react-native-get-random-values': 'org.linusu',
  'react-native-webview': 'com.reactnativecommunity.webview',
  '@react-native-firebase/app': 'io.invertase.firebase',
  '@react-native-firebase/dynamic-links': 'io.invertase.firebase.dynamiclinks',
  'react-native-inappbrowser-reborn': 'com.proyecto26.inappbrowser',
  'react-native-safe-area-context': 'com.th3rdwave.safeareacontext',
  'react-native-channel-plugin': 'com.zoyi.channel.rn',
  'react-native-screens': 'com.swmansion.rnscreens',
  '@react-native-async-storage/async-storage': 'com.reactnativecommunity.asyncstorage',
  '@react-native-community/masked-view': 'org.reactnative.maskedview',
  '@react-native-seoul/kakao-login': 'com.dooboolab.kakaologins',
  '@invertase/react-native-apple-authentication': 'com.RNAppleAuthentication',
  'react-native-reanimated': 'com.swmansion.reanimated',
  'react-native-svg': 'com.horcrux.svg',
  'react-native-device-info': 'com.learnium.RNDeviceInfo',
  'react-native-push-notification': 'com.dieam.reactnativepushnotification',
  'react-native-permissions': 'com.zoontek.rnpermissions',
  'react-native-splash-screen': 'org.devio.rn.splashscreen',
  '@react-native-cookies/cookies': 'com.reactnativecommunity.cookies',
};

function addNamespaceToGradleFile(gradleFilePath, packageName) {
  try {
    let content = fs.readFileSync(gradleFilePath, 'utf8');

    // 이미 namespace가 있는지 확인
    if (!content.includes('namespace')) {
      // android { 블록 찾기
      const androidBlockRegex = /android\s*{/;
      if (androidBlockRegex.test(content)) {
        // namespace 추가
        content = content.replace(
          androidBlockRegex,
          `android {\n    namespace "${packageName}"`,
        );

        fs.writeFileSync(gradleFilePath, content, 'utf8');
        console.log(`✅ Added namespace to ${gradleFilePath}`);
      }
    } else {
      console.log(`ℹ️ Namespace already exists in ${gradleFilePath}`);
    }
  } catch (error) {
    console.error(`❌ Error processing ${gradleFilePath}:`, error);
  }
}

function processNodeModules() {
  console.log('🔍 Starting to process React Native libraries...');

  // namespaceMap의 각 항목에 대해 처리
  Object.entries(namespaceMap).forEach(([lib, namespace]) => {
    let androidBuildGradle;

    if (lib.startsWith('@')) {
      const [org, name] = lib.slice(1).split('/');
      androidBuildGradle = path.join(
        nodeModulesPath,
        '@' + org,
        name,
        'android',
        'build.gradle',
      );
    } else {
      androidBuildGradle = path.join(
        nodeModulesPath,
        lib,
        'android',
        'build.gradle',
      );
    }

    if (fs.existsSync(androidBuildGradle)) {
      addNamespaceToGradleFile(androidBuildGradle, namespace);
    } else {
      console.log(`⚠️ Could not find build.gradle for ${lib}`);
    }
  });

  console.log('✨ Finished processing libraries');
}

// 스크립트 실행
processNodeModules();
스크립트의 주요 기능은 다음과 같다:
- 라이브러리별 namespace 매핑 정보 관리
- @org/package 형태의 패키지도 처리 가능
- 이미 namespace가 있는 경우 건너뛰기
- 작업 진행 상황을 콘솔에 표시
결과
이제 npm install을 실행하면 자동으로 다음과 같은 작업이 진행된다:
- 모든 패키지가 설치됨
- postinstall 스크립트가 실행되어 필요한 라이브러리에 namespace가 추가됨
- patch-package가 실행되어 수정된 내용이 패치로 저장됨
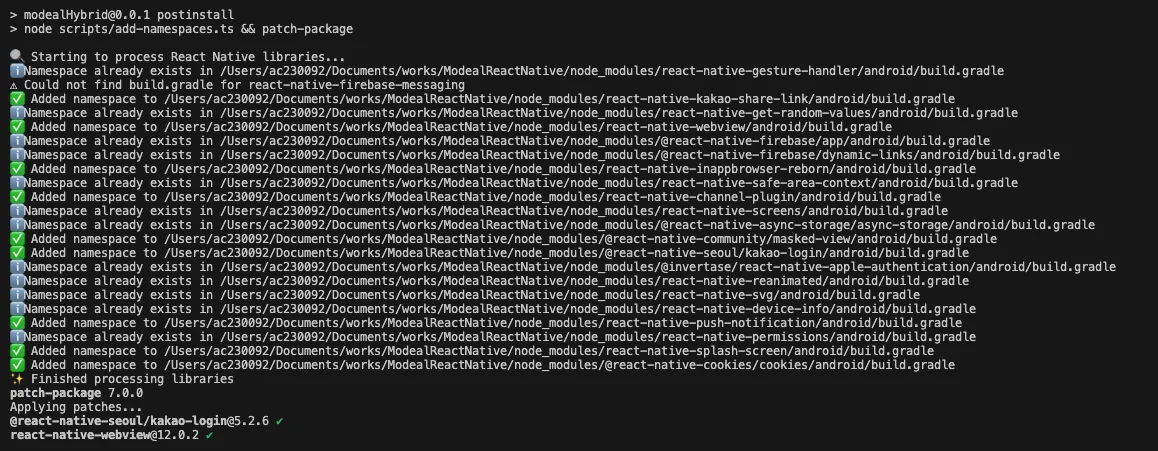
출력 결과를 보면 어떤 라이브러리에 namespace가 추가되었고, 어떤 것은 이미 namespace가 있어서 건너뛰었는지 확인할 수 있다.
마무리
이 자동화 작업으로 개발 환경 설정이 훨씬 수월해졌다. 새로운 팀원이 프로젝트를 셋업할 때도 별도의 수동 작업 없이 npm install 한 번으로 모든 설정이 완료된다.